Top-Quality Plastic Repair
At Plastex Repair Canada, we pride ourselves on offering top-quality plastic repair solutions that exceed expectations. With our user-friendly products and comprehensive resources, we empower you to tackle any repair project with confidence.
Watch Our Step-by-Step Video Guide

Easy-to-Use Plastic Repair Kit
PLASTEX is both a powder and a liquid. When combined, it actually becomes plastic. PLASTEX is extremely easy to use and has no mixing ratio. Every PLASTEX kit includes a reusable molding bar, which makes it simple to reproduce broken or missing tabs and parts. PLASTEX dries in about 20 minutes, although it should sit for 1 hour before being put to use or painted. PLASTEX does not have a shelf life when stored out of direct sunlight and high heat.


Versatile Applications for PLASTEX
PLASTEX is excellent for reproducing knobs and other small parts. It can also duplicate texture on parts by utilizing the molding bar, and it works great for repairs on plastic, fibreglass hulls, and tubs. Use PLASTEX to restore threads in wood and plastic, as well as for hobbies, crafts, and models. PLASTEX is great for cell phones, remote controls, and sunglasses. The applications for PLASTEX are almost unlimited.

Uses and Applications of PLASTEX
Filling Liquid Applicator & Powder Dish/ Using Needle Application Method


Applying PLASTEX Using Needle Application Method
Place the needle on top of the applicator bottle. Position the powder dish above, gently squeeze the liquid bottle, and place two or three drops into the powder. Quickly pick up the sphere with the tip of the needle and position it over the repair area. Gently squeeze the liquid bottle to flow the material onto the repair area, and repeat as needed to complete the repair.
Repairs Using PLASTEX
Stripped Threads
Prepare the repair area with a file, reamer, or drill. Apply a thin coat of spray lubricant or light oil to the screw threads. Apply PLASTEX to threads of the screw as needed, place coated screw into stripped out area, and allow PLASTEX to cure. Then the back screw is out, and the repair is done.
Fiber Reinforcement Cloth
First, repair the crack as instructed above. On the back side, grind away paint 1/2 inch on each side of the crack to ensure you are getting to clean bare plastic. Place fibre cloth on a piece of packaging tape and cover with PLASTEX powder. Saturate the powder and cloth completely with PLASTEX liquid, then place it in the repair area. Press firmly onto the material to ensure a great bond, then allow it to cure. Peel the packaging tape off and file or sand if needed.
PLASTEX Reusable Molding Bar
Heat the molding bar to 120 °F by placing it on a hot plate, a heat gun, or hot water (it becomes pliable at 120 °F). Once the bar is warm, form around the object you would like to duplicate and let it cool to room temperature. Remove the mold and transfer it to the repair area.
Place mold in place and apply PLASTEX mixture as needed.
Allow PLASTEX to cure and remove the molding bar, and your repair area is done.
The Stitching Method
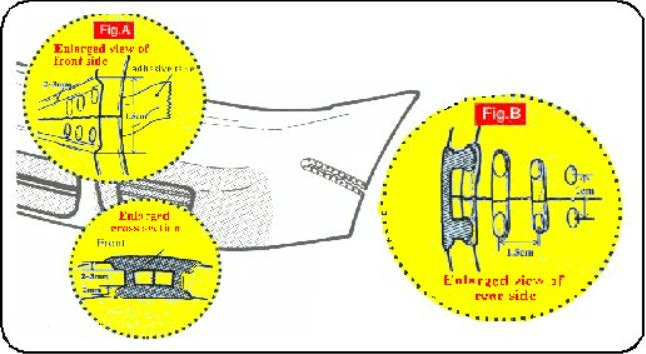
Use this method when the bond is poor (like on dirt bikes, ATVs, and other flexible plastics commonly made of polypropylene, polyethylene, or other types that won't allow a chemical bond). File or grind a groove along the repair area. Drill small holes along both sides of the repair. Apply adhesive tape on the front of the repair to keep the PLASTEX mixture from seeping through (see Figure A).
Repair Instructions for PLASTEX Application
Apply PLASTEX along the repair and into holes as needed. Allow PLASTEX to cure and remove the tape. To connect the holes on the opposite side, grind a groove on the back side of the repair.
Apply the PLASTEX mixture along the repair area.
Let PLASTEX cure. Sand and apply more PLASTEX as needed.


Our Story
Plastex Repair Canada is a division of First Stop Contracting Inc., founded in 2018. We take pride in being the exclusive Canadian distributor of PLASTEX products. Our extensive on-hand inventory ensures fast order fulfillment, allowing us to meet customer needs promptly and efficiently. Operating from our warehouse in Blackfalds, Alberta, Canada. We are dedicated to providing high-quality plastic repair solutions for various industries and applications.
About PLASTEX Plastic Repair Kits
Plastex Repair Canada has been the world's leader in plastic repair since 1996. PLASTEX is the originator of the technology we use in our repair kits, including our unique reusable molding bar. PLASTEX was thoroughly tested four years prior to its release in 1996 to ensure we were offering the highest quality product and one that was user-friendly for every customer. Plastex Repair Canada is always keeping up with leading-edge technology to ensure PLASTEX will continue to offer the best plastic repair products available.


